
By beloved Range Rover failed a Warrant of Fitness the other day. I was surprised, even though it has about 150,000 kms on the clock, it seems to be in pretty good condition, but I couldn’t argue, they showed me the play in the rear wheels.
A quick look on the forums showed that this was a common problem. Replacing them seemed like a bit of work and needed special tools. I needed it back on the road quickly so I decided to do the work myself. Firstly a pair of bushes were sourced from Forward Spares in Auckland for about $NZ90 each.
Below I’ve summarised the my experience in changing these as I couldn’t find any info on the internet.
WARNING : this is not the recommended procedure and there are risks that things may not turn out the way you wanted. This is purely a description of my experiences and there are likely to be much better ways of doing this.
The manual calls for the suspension to be depressurised, but I have no access to a Testbook or similar (I wish I had purchased the Blackbox Faultmate), so I raised the suspension to full height, placed axle stands under the four body jacking points and lowered the suspension.
Depressurise the rear suspension: Disconnect the battery so that the air suspension ECU isn’t tempted to do something untoward and take off the cover from the suspension valve body under the car.
Crack the connections to the rear airbags, enough to let the air escape from the rear airbags. I didn’t like doing this because there is a risk that it won’t seal up again properly. I would have much preferred to have released the air electronically through the solenoids. (The valve body looks far less complicated than the one in the P38 and probably much much cheaper to produce being plastic.)
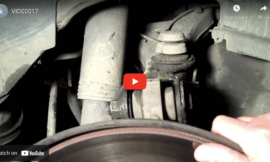
With the rear wishbone raised, disconnect the swaybar.

Lower the wishbone and disconnect the height sensor

Disconnect the lower shock absorber mount.
Remove the screw underneath the airbag.

Now remove all three bolts holding the wishbone in place and drop it out.
Next the bush needs to be removed from the hub, and Range Rover have special tools to accomplish this as we don’t really want to take the hub off to put it in the press.
Firstly remove the circlip around the bush and note which way its to be removed.
Now we need either Land Rovers Special tool or make one up. I decided to make one as getting one here in NZ was going to be a real mission.
The main bits we need is a piece of tube about 60mm long. You will notice in the photos that I had several pieces which I experimented with (the first one I made (notched, was too short).
I used a piece of old driveshaft 64mm ID and 3mm walls, but ideally tube with 60mm ID and 4mm walls would be best.
It may need to be notched as shown to clear the backing plate, but notching it does weaken it, 4mm walls will help.

Also I used 16mm threaded rod about 150mm long, with a couple of nuts and washers. I used 12mm initially because thats what I had on hand, but they snapped under tension.
You will also need a plate slightly larger than the tube with a 16mm hole drilled in the centre. 6mm isn’t strong enough (as I found out, 10mm is what I used in the end. In the photos you can see the plate I used, trimed at one end to make sure it didn’t foul the backing plate. Ideally a 10mm plate, cut in a circle slightly larger that the diameter of the tube and a 16mm hole in the centre is best.
Assemble the tool to press out the bush as shown in the picture. There is tremendous pressure generated, once the bush starts moving it gets easier (DON’T FORGET TO REMOVE CIRCLIP FIRST).

Once the bush is removed, install the new one by reversing the tool and pushing the bush in (make sure it goes in square).

Assembly is now the reverse and is quite straight forward.
There is a washer in the balljoint side of the sway bar that may have fallen out, and you will need to raise the wishbone with a jack to line up the airbag onto the wishbone and to connect the swaybar joint.
Once its all back together again, including tightening up the air connections on the valve body, comes the tricky bit in pressurising the system. In the manual it says not to lower the vehicle on the airbags without pressurising the system, so I left it on the jacks and started the car. The compressor needs some time to pump back up the reservoir .. then I ran into problems.. after running for a minute or so, the Suspension went into inactive mode, and despite trying to get it to behave itself, it wouldn’t go away. I suspect it was because I had the vehicle on jacks and the suspension wasn’t behaving the way it expected it to.
So I decided to take it off the jacks, and after a few cycles of starting and turning off the car it sorted itself out. It all seems to be fine now, but this was the mist unsatisfactory part of the job. If I did it again I think I’d lower it onto the bumpstops and let the system try to sort it out … maybe someone might have a better way of doing this ?
All seems to be fine now.
Thank you for posting. This was exactly the information I was looking for! I also have the squeek from the rear and it wanders a bit at the back when hitting a bump. With this info, my local garage can do the fix and I don’t need to bring it away to a dealership. Thank you for taking the time to do the write up.
Leo
RR L322 2002 170k km
No problem .. you are welcome
Awesome mate.. this what owning a RR is all about, thankyou i will be doing this job soon.
Thankyou
Ian
Pingback: Changing Rear Bushings - What's a good price to Pay for parts and labor?
Fairly easy job, takes no more than 30MINS a side, no need for pullers, just a large socket & heavy hammer to remove plus a section of tube to chap new one back in. Undo the rubber one side so you dont split it and belt the new bush back in. Needs two people, one to hold tube from twisting
the other to belt the tube. A Must. Get new bolts too., only need to undo the brake pipe bracket, and abs sensor wire clip. Dont hit anything else whilst using the hammer please.